Making the 3″ Ohio Star block for the center of the Winter Star is a lot of fun. I liked it so much, I went on to develop a whole library of 3″ block designs using similar techniques. But that’s another tutorial.
(Click on any image to make it large enough to see details.)
 In my Winter Star Quilt, each block has a slightly different version of the 3″ Ohio Star both in fabrics (scrappy) and the location of light and dark values. I’m going to show you three versions.
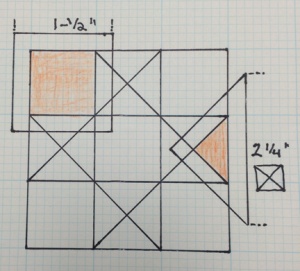
If we look at a drafting of a 3″ Ohio Star, we see only 2 shapes: a 1″ finished square for the center and corners, and a triangle for the 4-triangle square units that make the star points. The square is easy: it will be cut at 1-1/2″.
The triangle needs some work before we know how to cut it. First, following the rule of straight grain (straight grain should fall on the outside edge of the pieced unit), it should be on the long side of the triangle. In rotary cutting, these triangles are called Quarter-Square triangles. Essentially, you cut a square and cut it on the diagonal twice to get 4 triangles with straight grain on the long side. The formula for getting the size of the square to cut is to add 1-1-/4″ to the finished long side of the triangle: 1″ + 1-1/4″ = 2-1/4″. Or, you can simply measure the long side of the triangle including seam allowances and you will get the same measurement.
 For our Ohio Star, if we cut the squares 2-1/4″, we will get triangles that are exactly the right size. BUT, if our sewing isn’t absolutely accurate the resulting finished dimension could easily be off. I prefer to OVERCUT the squares by 1/4″: cut 2-1/2″ squares instead of 2-1/4″. This will make the 4-triangle star point units too large, but they can easily be cut down to the correct size using the Precision Trimmer 6. My Feathered Star Ruler also has appropriate markings. You can order these rulers on the website: http://www.marshamccloskey.com/rulandnot.html
Here’s how I do it:
1. To make the four 4-triangle units needed for the 3″ Ohio Star, start by choosing 2 fabrics: a light and a dark. From each, cut 2 squares 2-1/2″ x 2-1/2″.
2. Place the light and dark squares right sides together and cut diagonally once. This set-up will make 4 star point units.
 3. Stitch the 4 triangle pairs together on the long sides. Press the seams to the dark. At this point, I like to trim the seam allowance down to a little more that 1/8″. If you trim too much, the seam won’t lie flat. I use a very sharp pair of scissors for this: I like Karen Kay Buckley’s 7-1/2″ Perfect Scissors because they are sharp all the way to the tips and are slightly serrated to grip the fabric. You can buy Karen’s scissors on my website: http://www.marshamccloskey.com/pesc.html
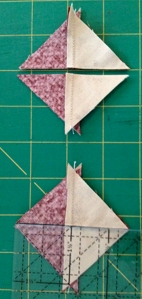
4. Place the 2-triangle-square units together with right sides facing, seams butting and colors opposite. Cut the square pairs diagonally (across the seam line) to make 4 new triangle pairs
5. Pin. and then stitch the pairs together, to make 4 four triangle square units (two are shown). Press the seam open, then trim.


 6. Using the Precision Trimmer 6 ruler, center the 1-1/2″ marked square on the pieced unit. The diagonal ruler lines in the square should line up with the seam lines. Essentially, you’re measuring from the center of the square. Trim off two edges as shown. Turn the pieced unit around and trim the other 2 sides.
 7. Now, you should have 4 perfectly sized star point units for your 3″ Ohio Star. With these, you can choose to make a light star on a dark ground OR a dark star on a light ground. The center (1) and corner squares (4) are cut 1-1/2″ x 1-1/2″.
If you want to add a third color (a medium) to the star point units, do this:
1. Cut four 2-1/2″ squares: 2 dark, 1 light and 1 medium. Place a dark and a light square right sides together. Place a dark and a medium square right sides together. Go to step #2 above and follow the same directions.
In the next post, I’ll show you how I set up my sewing machine for accurate piecing and how to stitch the Ohio Star parts together to get great points and the correct finished size.


I have to try this block.